Transvenous Pacing

Full Transvenous Pacemaker Setup:
1. 6F Cordis
2. Swan Ganz Pacing Catheter
3. Nonsterile Connecting Cable
4. Pacing Generator

Indications

  • Symptomatic sinus bradycardia (after atropine, +/- dopamine/epinephrine, and transcutaneous pacing have failed)
  • Mobitz type II second degree AV block
  • Complete heart block
  • Beta blocker or calcium channel blocker overdose

Preparation 

  • Patient positioning: supine/Trendelenburg
  • 6 French Cordis (“percutaneous sheath introducer kit”)
  • Swan Ganz/Bipolar pacing catheter
  • Pacer generator (“temporary pacemaker”)
  • Nonsterile connecting cable (within pacer generator case in inside sleeve)
  • Ultrasound + sterile probe cover

Supplies and room 9 location

Room 9 bay 1, bottom shelf on right
Swan Ganz/Bipolar pacing catheter
Pacer generator (Nonsterile connecting cable in the inside sleeve)
6 French Cordis (“percutaneous sheath introducer kit”)


Pacer generator—initial settings 

  • Turn on
  • Rate—80 bpm, rate at which patient will be transvenously paced, at least 20 bpm over the intrinsic rate
  • Output—20 mA, electrical output of pacer with every paced beat, decrease until patient has both mechanical (palpating patient’s pulse) and electrical capture
  • Sensitivity—3 mV, pacer’s ability to sense intrinsic rate (the lower the sensitivity, the more the pacer will detect intrinsic rate; for example, at 3 mV, the pacer will only detect impulses generated from the heart that are greater than 3 mV)
    • Oversensing- Sensitivity is set too LOW so electrical signals are inappropriately recognized as cardiac activity and pacing is inhibited
    • Undersensing- Sensitivity is set too HIGH so pacemaker ignores native cardiac activity

Location

  • Right internal jugular—preferred
  • Left subclavian—use as second option, preferred to leave site available for possible permanent pacer

Steps to placing transvenous pacemaker

  • Place cordis
  • Set up nonsterile connecting cable (helpful to have assistant connect cable to pacer generator as these are not sterile)
  • Ensure proper balloon inflation on Swan Ganz
  • Position sterile sleeve over pacer wire and ensure correct orientation
  • Insert pacer wire into cords and advance to 20cm (indicated by first two black lines)
  • Insert Swan-Ganz + and – pins into nonsterile connecting cable (proximal to positive, distal to negative)
  • Have assistant turn on pacer generator with the above settings (remember it is non sterile)
  • Inflate balloon and lock purple stopcock (stopcock is on Swan, catheter see below image)
  • Advance pacer wire to ~30-35cm (three black lines on pacer wire) while watching monitor for capture (STEMI pattern)
  • Troubleshooting: 
    • if wire coils in RA, pull wire back, twist 180˚ towards patient’s right and re-advance
    • if wire fails to capture, can adjust pacer generator settings, consider increasing output and decreasing sensitivity
  • Verify capture by either palpating pulse or by pulse ox waveform
  • Decrease output until there is no longer capture, then titrate up to the lowest effective output
  • Deflate balloon and turn stopcock off
  • Expand sterile sleeve
  • Suture cordis and place sterile dressing
  • Secure pacer wire to patient with tape (can dislodge easily)
Stopcock that comes attached to Swan-Ganz pacing catheter

Complications

  • Misplacement—can verify with ultrasound or chest x-ray
  • Ventricular perforation
  • Dysrhythmias
  • Pneumothorax

The Lateral Canthotomy – The Unicorn of Procedures

Apparently I’m a magnet for ocular trauma. Oddly enough, it’s the one thing that still makes me queasy. Anyways, I feel like over the past year I’ve dealt with quite a few cases of orbital compartment syndrome, mostly which have been traumatic in nature. After having done a few lateral canthotomies, I have a few pearls that may help others along the way. I think the hardest part of the entire procedure is making the decision to actually do it.

You should have suspicion with any patient presenting to the ED with any obvious facial trauma. I generally start off with gross testing of visual acuity, seeing if patient can see first light, then the number of fingers that I’m holding up. If they can see both, then my suspicion is much lower. What generally makes me more concerned is when the patient states they cannot see out of one eye. Often, in the case of trauma, this will be secondary to significant swelling causing the lids to be swollen shut, which obstructs the patient from physically opening their eye. If you manually open it, the hope is that they will be able to see.

This is where things can get muddy. Most often, when their lids are this swollen, you’re going to have a difficult time manually opening the lids. Also, if it’s traumatic related, theres likely to be blood around the eye which adds in another layer of difficulty of opening the eye. Optho has some really nice ocular forceps, but I don’t believe we have them in our canthotomy tray.

The easiest way that I have found to open both lids is with the use of two paperclips. First I wipe them off with alcohol and then bend them in such a manner that one of the curved ends is folded backwards. This will allow you to have a smooth, rounded object to elevate the eye lid. Obviously, DO NOT DO THIS IF YOU ARE CONCERNED FOR AN OPEN GLOBE.


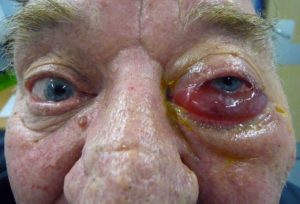
I feel like in most of these patients, they have significant chemosis noted to the sclera which looks like the photo below. Seeing this also makes me concerned that theres a reason the sclera is so congested (vascular congestion secondary to obstruction).


Once you have the lid retracted, now is time to establish if the patient has vision in that eye. You’re going to want a helper to keep the lids retracted. I attempt to get the patient to see how many fingers I’m holding up. If they can’t see that, I try and figure out if they can see light. If the patient states that they cannot see, I “challenge” their vision in that eye, most often by flicking a finger close to their eye in a rapid manner to see if they blink. A normal person is not going to let you flick at their eye without blinking. If they don’t blink, I start to get more concerned.

The next piece of info you’re going to want is to get a pressure. It seems like majority of the ones I have done, pressures have been in the upper 40s to 50 or either the tonopen reads “err.”  Keep in mind if you use the tonopen too aggressively, you will get a falsely elevated pressure.

If I have gotten this far and I’m still convinced that the patient has no vision in the eye and their ocular pressures are elevated, I’m getting set up to perform the canthotomy. I’m of the notion that if it’s THAT important to do emergently, I’m going to call opthamoloy after I have treated the emergency.


Ideally, the procedure is best done in room 9 if you are capable for a few reasons

#1: the overhead lights in there are great and vastly improve your visibility during the procedure.

#2: you’re going to want to sedate the patient to make it more comfortable. I typically use fent/versed. i try to avoid ketamine for the theoretical idea that it likely increases IOP.

#3: the lateral canthotomy tray is in bay 4. if you’re standing at the foot of the bed, its immediately on your right, like the 2nd shelf from the top in the pixis closest to you.


So you’ve decided to do the canthotomy. Lighting is great. You have your tools at bedside. You’ve got the patient hooked up to the monitor. You’re all ready to sedate the patient. You push drugs and start the procedure. At this point, you’re going to want to start anesthetizing the region. To do this, start AT the lateral canthus and orient your needle AWAY from the globe. You want to inject out towards the lateral orbital rim, away from the eye ball. While you’re injecting, this is giving your patient time to start having some effects of the sedation.


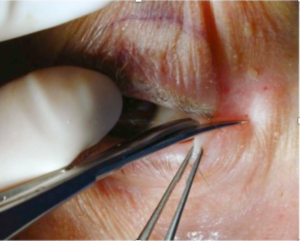
After you have anesthetized the area, take a few saline flushes and rinse out the eye in case there is in foreign debris. Next, in theory you should use a hemostat to “crimp” the margin at the lateral canthus. Optho has rolled their eyes at me when I’ve done this and they say it isn’t necessary. The idea is that it is supposed to help it not bleed as bad when you cut this area. I personally don’t do it for the hemostatic purposes. I feel like crimping the area generally helps get a small amount of swelling out of the way so I can fit in the tips of my iris scissors when I go to make the first cut. This is ultimately why I continue to do this part of the procedure.


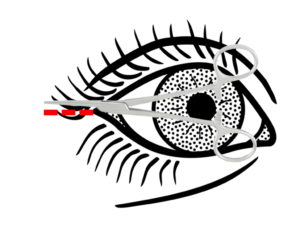
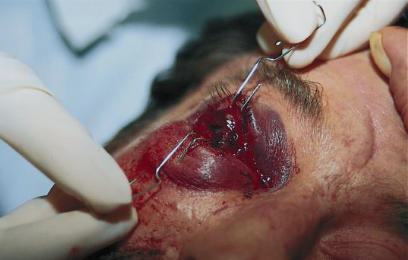
After you have crimped the tissue for 10-20 seconds, remove the hemostats. You’re going to want to use the iris scissors at this point in time. You’re going to encounter some difficulty because both lids are edematous and likely there is significant edema in the sclera. You’re going to be shitting yourself because it’s hard to tell what’s sclera and what is skin/skin structure. This is when the overhead lights in room 9 REALLY help make a difference. Once you are able to identify the lateral canthus, open the iris scissors and insert one blade below the lateral canthus directed away from the eye. You are going to want to bluntly disect infero-laterally towards the lateral orbital rim. Your ultimate goal will be to cut ~1cm of the skin overlying the lateral canthus and then disect down to the lateral canthal tendon, just medial to Whitnall’s tubercle.


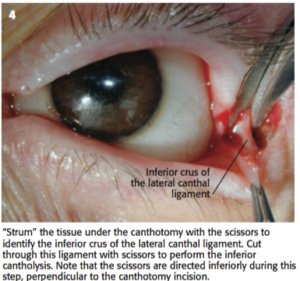
At the lateral canthal tendon, there will be two bands of fibrous tissue; the superior and inferior crus. Generally it is the inferior crus that is relieved first in this procedure.


At this point, things are going to be a bloody mess, so the best way to identify them is to use the tip of your iris scissors and literally “strum” the tendon. It will feel exactly how you expect it to feel. You will feel the tendon strum. When you do this, make small movements, almost like micro-movements. As you strum the crux, you will be able to tell where one side starts and terminates. You may be able to physically see it if you’ve disected well enough. Regardless, you can use the tips of the iris scissors to envelop the crux and make the cut. If you have done this correctly, you should appreciate that the lid has relaxed. If the eyelid doesn’t feel any more mobile than previous, take a deep breath. Try and use some 4x4s to clear away the blood and take a better look. Likely you haven’t fully transected the ligament if the lid isn’t relaxed, even if you think that you might have.


If you have been successful, you will be able to appreciate that the lid is less constrictive of the globe. Now, go ahead and check your pressures at this point. Assuming that the pressures are significantly improved, you’re done.  Say your pressure wasn’t reading prior to the procedure and now its still in the upper 40s and you have verified that you have transected the inferior crus, the patient will likely need the superior crus transected as well. You are capable of doing this; however, if you’re uncomfortable, optho will likely do it when they arrive. Just go about transecting the superior crus in the same fashion.

Speaking of optho, now that the emergent situation has been handled, this is the time to give them a call and let them know that you’ve decompressed the patient’s orbit. They will come in and do their thing and you can carve another notch in your belt.

_____________________________________________________________________________

On a side note, I had a non-traumatic orbital compartment syndrome a few months back. The guy came as a transfer from an outside facility with unilateral vision loss, proptosis, and headache. CT at OSH showed an intraorbital mass. I’m not certain why, but given it was not traumatic, I didn’t think to immediately decompress his orbit as his symptoms had been persistent over the past two days and not acute in onset. Make note, it is still completely acceptable and recommended to perform a canthotomy in this setting. Just something that I realized in hind-sight.


Anyways, this is a lot of reading. If you made it to here, thanks. Hopefully this was somewhat clear. If you have any questions, I’m happy to answer.


References:

Roberts and Hedges Clinical Procedures in Emergency Medicine – Opthalmologic Procedures: Chapter 62 pg 1295.


Paraspinous blocks for migraines

Many of you have probably heard me discuss my love of paraspinous blocks for migraine headaches, and I know several of you have learned how to do them on me when I have a migraine. This seems to be one of those slightly voodoo things that I would have sworn could never work, until I tried it and had almost immediate relief when several traditional abortive therapies failed.

For those who haven’t, this is an incredibly easy procedure that takes a minimal amount of time and can give real relief in migraine patients. There is no complicated anatomy involved, no significant technique or skill level required, and is safe enough that I have talked many novices through the procedure on a patient with supervision.

To do the block, the most important part is selecting the correct patient to increase your chances of success. Technically it won’t hurt anyone to do a block on them, but I’ve quickly learned this has a near zero chance of working in patients who state only an IV cocktail of dilaudid and phenergan works for their migraines. I’ve also found minimal effects on those who are texting while under bright lights and listening to music. I have had the most success on patients that look absolutely miserable: the ones curled up into a fetal position, actively vomiting, crying, with all the lights out and begging you to do ANYTHING to make their headaches go away. These people also tend to be quite enthusiastic about a treatment that you can administer on the spot and will work within 5-10 minutes typically. For all the things we do that sometimes have fairly minimal objective evidence of relief, it makes me very happy to walk back into a room in 20 minutes and see this previously miserable patient looking completely normal, stating their headache has resolved, and being ready to discharge… all without medications from pharmacy or an IV.

I typically use bupivicaine and do not use any subcutaneous lidocaine as the youtube video attached at the end of this post shows. I draw up 3cc, planning to use 1.5cc on each side. Your landmarks will be your C6 or C7 spinous process. I typically go C7 because it is easy to find by asking patients to flex their chin to their chest, and I like to keep things easy. C7 is the most prominent spinous process at the base of the neck. Not sure if you’re at C6, C7, or T1? Even better, for this block it doesn’t really seem to matter because it still works! You’ll be injecting approximately 2cm laterally to the edge of the spinous process, give or take half a centimeter based on body size. Again, don’t get too caught up in the details- it seems to work at 1.5cm to 3cm laterally to the process. After a swipe with an alcohol prep (bonus points- you can hand the patient another alcohol prep pad to inhale for relief of their nausea and vomiting! See last week’s journal club article for more details), you’ll insert the needle (any size, but a 25g hurts less) parallel to the ground in a straight anterior tract. I insert the needle 1.5-2cm. Aspirate to make sure you aren’t in a vessel, then inject 1cc of bupivicaine deep, and the remaining .0.5cc while withdrawing your needle. Repeat on the opposite side, stick a bandaid on, and reasses in about 20 mins. If it’s going to work, most seem to start to get significant relief in about 10 mins. If unchanged in 20ish minutes, I proceed to other therapies.

When I’m in first care, I typically will take a bottle of bupivicaine and a needle/syringe into the room when I walk in for an initial evaluation. If the patient seems to be a good candidate and is agreeable, I go ahead and do the block at that time. By the time I do my charting or see the next patient, I typically have a good idea of if the patient has improved, or rather if I need to start ordering other therapies.

Quick and easy, and I have about a 60-75% success rate on patients. Pretty good considering a standard migraine patient will likely take a couple of hours to receive IVFs, meds and reassess. You can sometimes get these people dispo’d in less than 30 minutes!

I’ve attached a quick video for you visual learners

Emergency Escharotomy

Case: 57 yo M who presents via EMS found with circumferential burns on bilateral lower extremities, left upper extremity, lower pelvis, and left side of chest after being trapped in a burning tent. Unknown time of incident.

VS: HR: 128, RR: 24, BP: 112/64, SpO2 96% on 4L O2

Alert, oriented x 2. SEVERELY DISTRESSED. Singed nares bilaterally. Bilateral wheezes, tachypneic. Tachycardic, RR. Abd S/NT/ND. Once again, 3rd degree burns circumferential burns from lower pelvis, extending to groin, and down to bilateral lower extremities. The 3rd degree burn covered the left side of his chest and his RUE. No pulses were palpated in his LUE or BLE. Though burned, BLE and RUE appeared blanched with poor cap refill and cool to touch. 72% estimated burn coverage total. Pt stated he was unable to feel or move bilateral lower extremities.

During the process of IV, O2, monitor, and moving the pt over. I called for pain medication, intubation meds, and got the equipment ready for intubation.

Trauma, Plastics, Urology – paged. Don’t wait to get consults on board in a case where you are preparing to do this procedure.

On physical exam, remember Wallace rule of nines (see total body surface area): 9% for each arm, 18% for each leg, 18% for the front of the torso, 18% for the back of the torso, and 9% for the head and 1% for the perineum. At the same time, think Lactated Ringers at 4 mL x kg x percentage burn = total fluids needed for replacement in initial 24hrs. First half of amount in first 8 hours with the second half over 16hrs{{Parkland}}.

But, first, intubate to secure the airway, provide pain control, and facilitate further exam. Needless to say, burns are extremely painful.. . so are escharotomies.

Trauma wedge took the RLE, and I had the LLE. In the race to get pulses back, I succeeded and was rewarded with getting to do the LUE as well.

How did I perform the procedure you ask? Well, it was with the Trauma fellow standing at the foot of the bed giving instructions and guidance . .. I had never seen anything like this except for textbook cases of a circumferential burn to the chest/trunk. This procedure is not on our sign off list, required list, or on anything that I had seen in cadaver lab.

While these procedures are as rare as a Trauma fellow eager to teach at 2 am, you may be faced with the same in a rural ED or with a wedge stuck in the OR, etc.

Advice: Be nice to your colleagues. And, more importantly, prepare.

Here are some very informative links that would’ve been great to have seen or reviewed prior.

Step 1: Read the Overview

Video 1: Robot voice explanation: Best display of lines for incision, but more from a surgical perspective

Video 2: Australian Escharotomy How-to

FYI:

Suprapubic catheter was also placed in the ED prior to the pt going to the OR. Another rare procedure, not required, but useful to know.